Where and how to change any Alfresco related port

Due to a conversation in Twitter with @binduwavell I haven’t found a single place where to find how to change any port related to all services that Alfresco runs. So, I have decided to write a blog post about it with some notes from Rich McKnight.

Here you go a comprehensive list of all ports and where to change them:

Tomcat:

  • HTTP 8080: tomcat/conf/server.xml
  • HTTPS 8443: tomcat/conf/server.xml
  • Shutdown Port 8005:  tomcat/conf/server.xml
  • AJP 8009:  tomcat/conf/server.xml
  • JPDA 8000: catalina.sh

Alfresco:

Alfresco context inside Alfresco configuration: alfresco-global.properties

  • alfresco.port=8080

Share:
Share context inside Alfresco configuration: alfresco-global.properties

  • share.port=8080

If repository ports are changed you change Alfresco Share connection ports in web-extenxion/share-config-custom.xml

Alfresco SharePoint Protocol: alfresco-global.properties

  • vti.server.port=7070
  • vti.server.external.port=7070

OpenOffice – LibreOffice: alfresco-global.properties

  • ooo.port=8100

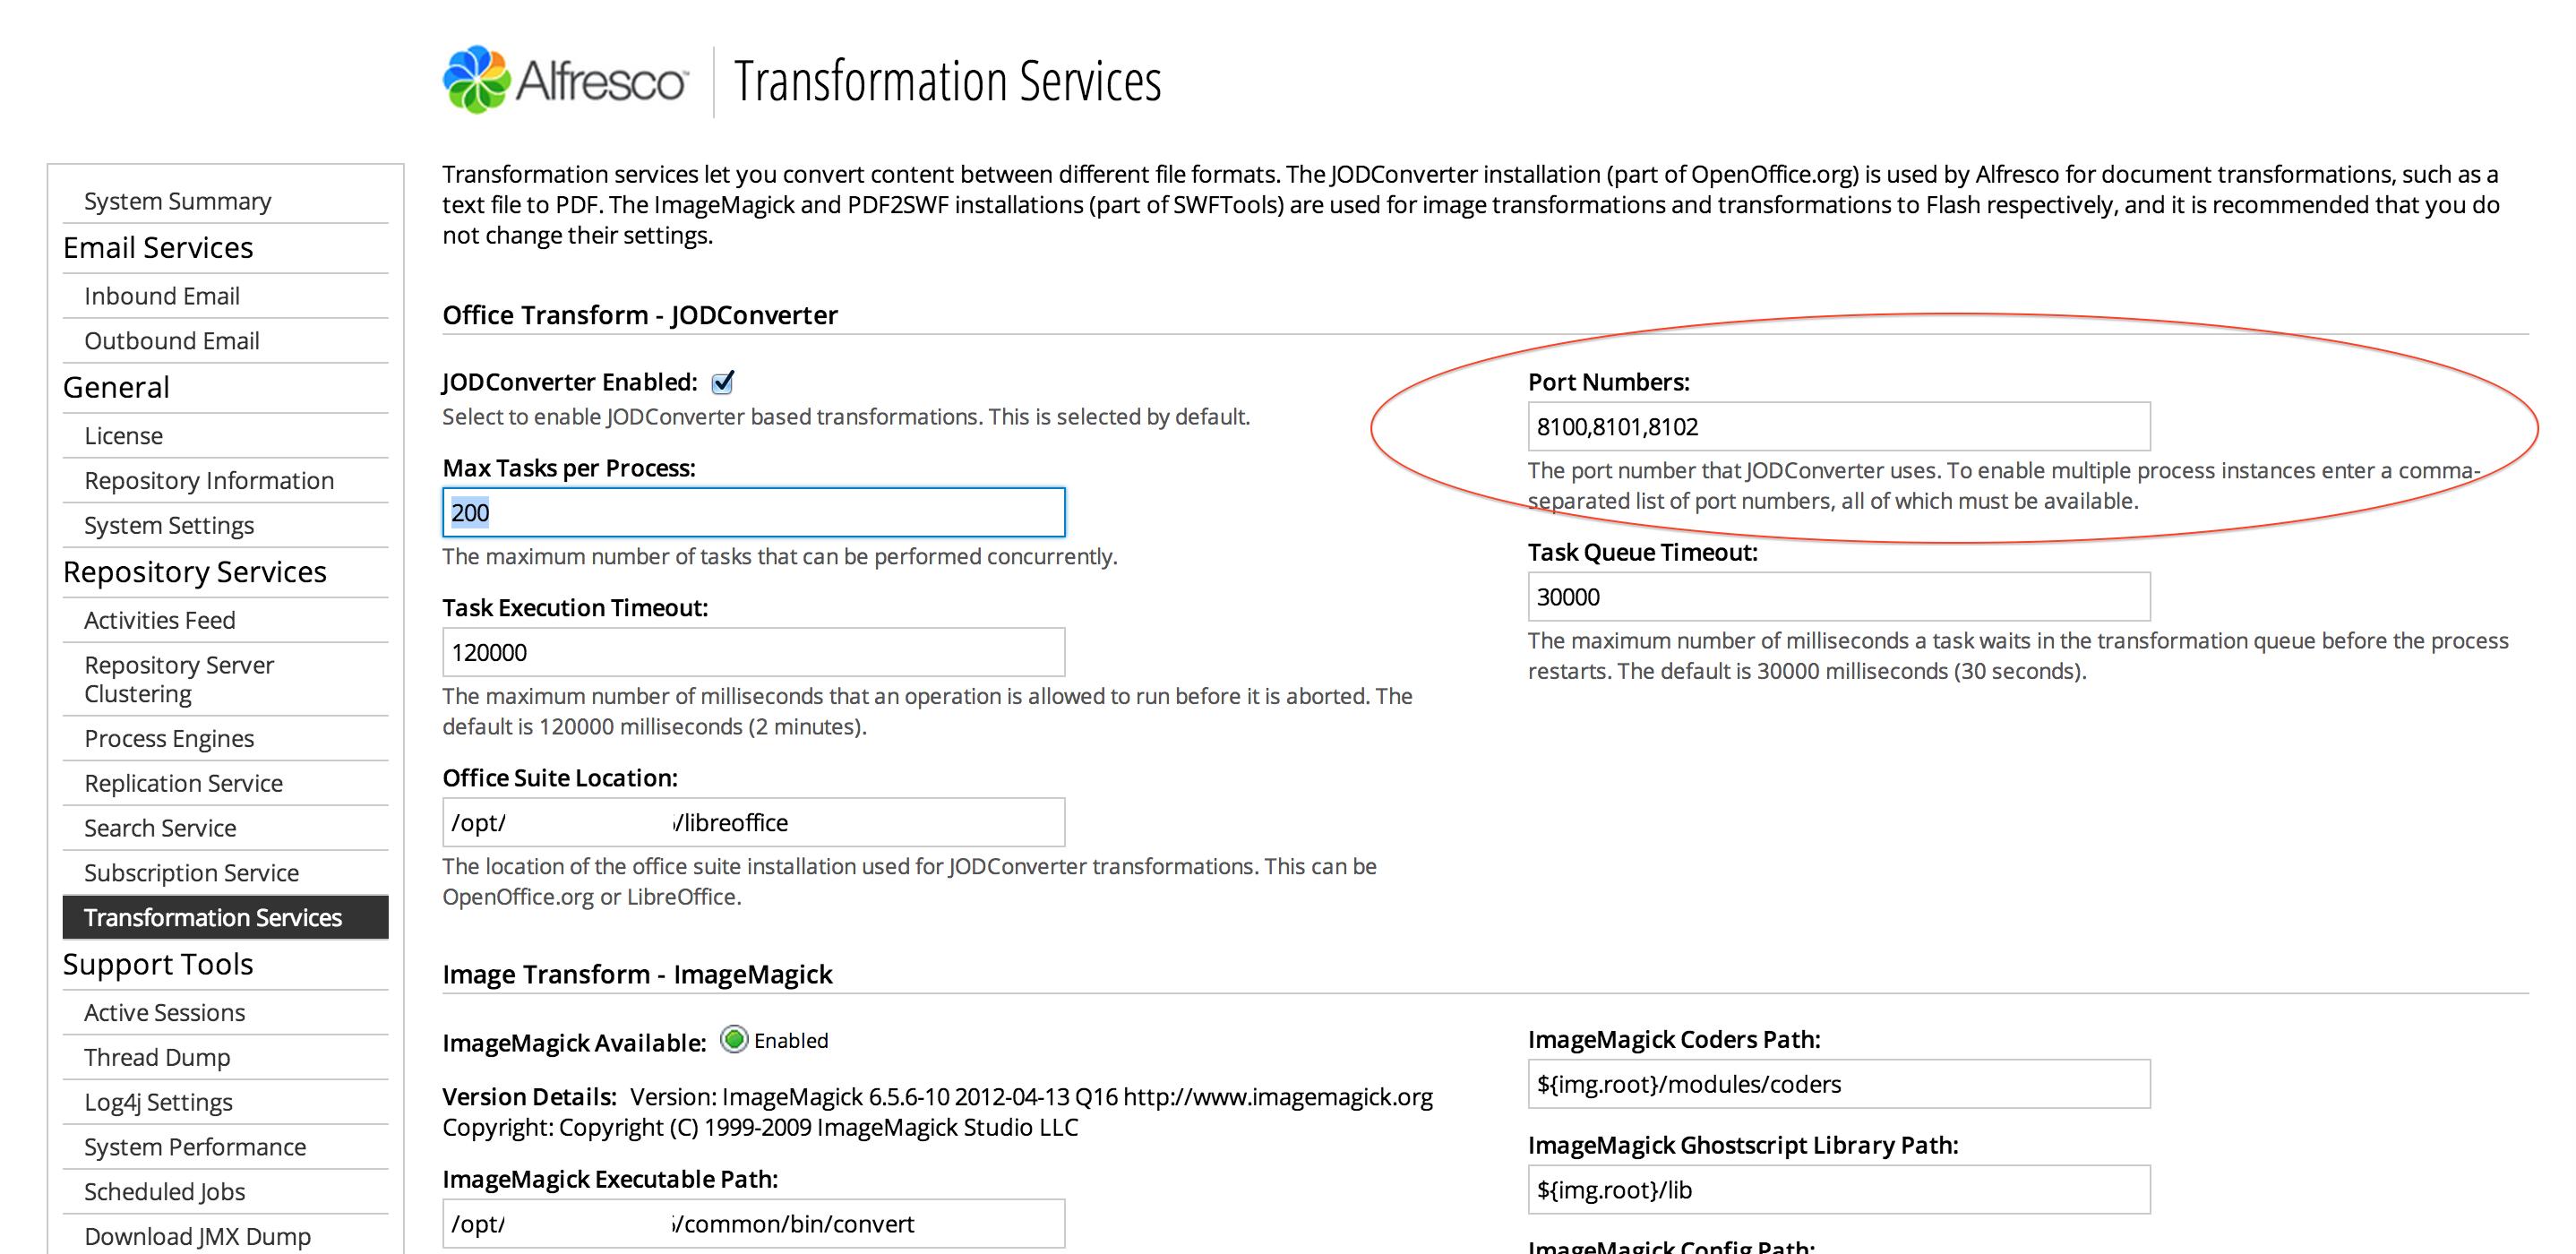
JodConverter: alfresco-global.properties

  • jodconverter.portNumbers=8100

FTP: alfresco-global.properties
Can be mapped to non-privileged ports, then use firewall rules to forward requests from the standard ports

  • ftp.port=21

CIFS – SMB shared drive: alfresco-global.properties
Can be mapped to non-privileged ports, then use firewall rules to forward requests from the standard ports

  • cifs.tcpipSMB.port=445
  • cifs.netBIOSSMB.sessionPort=139
  • cifs.netBIOSSMB.namePort=137
  • cifs.netBIOSSMB.datagramPort=138

IMAP: alfresco-global.properties
Can be mapped to non-privileged ports, then use firewall rules to forward requests from the standard ports

  • imap.server.port=143

Inbound Email (SMTP): alfresco-global.properties
Can be mapped to non-privileged ports, then use firewall rules to forward requests from the standard ports

  • email.server.port=25

NFS server: alfresco-global.properties
Mount/NFS server ports, 0 will allocate next available port

  • nfs.mountServerPort=0
  • nfs.nfsServerPort=2049

RPC registration port, 0 will allocate next available port
Some portmapper/rpcbind services require a privileged port to be used

  • nfs.rpcRegisterPort=0

To disable NFS and mount server registering with a portmapper set

  • nfs.portMapperPort to -1
  • nfs.portMapperPort=111

Cluster in 4.2 with Hazelcast: alfresco-global.properties

  • alfresco.hazelcast.port=5701

Cluster in 4.1 with JGroups: alfresco-global.properties

  • alfresco.tcp.start_port=7800

Solr:
From Solr to Alfresco workspace queries:  ./alf_data/solr/workspace-SpacesStore/conf/solrcore.properties

  • alfresco.port=8080
  • alfresco.port.ssl=8443

From Solr to Alfresco archive queries:  ./alf_data/solr/archive-SpacesStore/conf/solrcore.properties

  • alfresco.port=8080
  • alfresco.port.ssl=8443

From Alfresco to Solr queries:  alfresco-global.properties

  • solr.port=8080
  • solr.port.ssl=8443

RMI service, JMX ports: alfresco-global.properties

  • alfresco.rmi.services.port=50500
  • avm.rmi.service.port=0
  • avmsync.rmi.service.port=0
  • attribute.rmi.service.port=0
  • authentication.rmi.service.port=0
  • repo.rmi.service.port=0
  • action.rmi.service.port=0
  • deployment.rmi.service.port=0

Monitoring RMI:

  • monitor.rmi.service.port=50508

Alfresco Tip: How to enable SSL in Alfresco SharePoint Protocol

There are two ways to approach getting the Alfresco SharePoint Protocol to run over SSL and avoid having to modify the Windows registry for allow non-ssl connections from MS Office (in both Windows and Mac).

One way is to use the out of the box SSL certificate that Alfresco uses for communications between itself and Solr (this blog post is about this option). The other is to generate a new certificate and configure Alfresco to use it, which is the option if you want to use a custom certificate. Next steps tested on Alfresco 4.2, it should work in 4.2 as well for both Enterprise and Community. Please, let me know through a comment if you have an objection on this.

  • 1. Rename file tomcat/shared/classes/alfresco/extension/vti-custom-context.xml.ssl to tomcat/shared/classes/alfresco/extension/vti-custom-context.xml, if it does not exist just create it like below:

[xml]

<?xml version=’1.0′ encoding=’UTF-8′?>
<!DOCTYPE beans PUBLIC ‘-//SPRING//DTD BEAN//EN’ ‘http://www.springframework.org/dtd/spring-beans.dtd’>

<beans>
<!–
<bean id="vtiServerConnector" class="org.mortbay.jetty.bio.SocketConnector">
<property name="port">
<value>${vti.server.port}</value>
</property>
<property name="headerBufferSize">
<value>32768</value>
</property>
</bean>
–>

<!– Use this Connector instead for SSL communications –>
<!– You will need to set the location of the KeyStore holding your –>
<!– server certificate, along with the KeyStore password –>
<!– You should also update the vti.server.protocol property to https –>
<bean id="vtiServerConnector" class="org.mortbay.jetty.security.SslSocketConnector">
<property name="port">
<value>${vti.server.port}</value>
</property>
<property name="headerBufferSize">
<value>32768</value>
</property>
<property name="maxIdleTime">
<value>30000</value>
</property>
<property name="keystore">
<value>${vti.server.ssl.keystore}</value>
</property>
<property name="keyPassword">
<value>${vti.server.ssl.password}</value>
</property>
<property name="password">
<value>${vti.server.ssl.password}</value>
</property>
<property name="keystoreType">
<value>JCEKS</value>
</property>
</bean>
</beans>

[/xml]

  • 2. Now add the required attributes to alfresco-global.properties:

[bash]

vti.server.port=7070
vti.server.protocol=https
vti.server.ssl.keystore=/opt/alfresco/alf_data/keystore/ssl.keystore
vti.server.ssl.password=kT9X6oe68t
vti.server.url.path.prefix=/alfresco
vti.server.external.host=localhost
vti.server.external.port=7070
vti.server.external.protocol=https
vti.server.external.contextPath=/alfresco

[/bash]

Remember to change localhost to your server full name (i.e. your-server-name.domain.com).

  • 3. Restart the Alfresco application server and try the “Edit online” action on a MS Office document through Alfresco Share. A warning message will appear to accept the Alfresco self-signed certificate but is a common behavior.

MS Office for iPad and Alfresco: simple + smart integration

As you may already know, the Office app for iPad was released last friday. Since then I have been playing around with it, at the end of the day it is free for opening documents as read only. If you want to edit and save documents you need an Office 365 subscription. I purchased their Home subscription, $9.99/month after the free 30 days trial.

Once I opened the Office Word app  I noticed it has an option to add a SharePoint location and YES! I thought about Alfresco. What happen if I try to open a document stored in Alfresco through the SharePoint Protocol?  Well… the answer is simple (and smart), it works!!

Let me explain how it works through some screenshots. Here the screenshot asking for the SharePoint Site URL:

1-ss

Now you have to add the full Alfresco URL of the document you want to open:

2-ss

I did try with Alfresco Cloud because it has a valid SSL certificate. In this case you should use an URL like this:

https://sp.alfresco.com/<cloud-network-domain>/<site-name>/<file-name>

Now it asks for your Alfresco credentials:

image-12

For Alfresco Cloud you have to use your user@domain and a valid password. For Alfresco on-premise your user and password.

Now it downloads the file stored in Alfresco to the iPad, in this case a file called Report.docx:

image-8

Once opened we can see their “show-me-the-money” Read-Only warning 😉 and the document opened:

image-13

If you tap on “Activate” you can choose between to activate or buy an Office 365 subscription:

image-11

After logging with a valid Office 365 credentials you can edit  documents:

image-4

And of course, while a file is opened it is locked in Alfresco:

Screen Shot 2014-03-29 at 9.42.30 PM

Ok, we know how to open and write documents stored in Alfresco, what about to create a document and save it to Alfresco? Easy, tap on new and choose a black document or a template:

photo

After writing the new document, tap to the arrow icon in the top left hand side and the “Save As” option appears with the last location from where the last document was opened:

image-6

Chose a document file name and done! It saves the new document in Alfresco.

The app gives you quickly access option to open recent documents, just tap on “Recent” in the left hand side menu:

image-2

Versions are  supported in Alfresco and any change in those documents through the Office for iPad app are automatically versioned in the repository.

Another useful option is the ability to send a document link through email, the document itself can be sent as attachment as well:

image-3

Does it work with the Alfresco Mobile app? You can open a document in Office from the Alfresco Mobile app and save the document in your recent places including Alfresco, but unfortunately the “Save back” option is not in the Office app:

3-ss

Does it work with Alfresco on-premise? I haven’t try yet, it should work with Alfresco on-premise but you will need a valid SSL certificate and having Alfresco SPP configured with SSL or you will get the error below. I used an URL like https://localhost:7070/alfresco/<site-name>/documentLibrary/<file-name> note the difference between the cloud and on-premise URL, in both cases the file extension must be added as file name.

image2

I will keep you posted as soon as I can try with a valid SSL certificate.

Finally, you have seen how easy is to take advantage of the Alfresco and SharePoint compatibility 😉

Alfresco Tip: Unattended installation with one command

This tip is valid for Linux and Windows and should be for Enterprise and Community as well. I have tried with last Enterprise build 4.2.0.3 on Ubuntu.

How to do an unattended installation of Alfresco with MySQL support with just one command, is as easy as running the command below (all in one line):

[bash]

sudo ./alfresco-enterprise-4.2.0.3-installer-linux-x64.bin –prefix /opt/alfresco \

–unattendedmodeui none –mode unattended –debuglevel 0 \

–enable-components javaalfresco,alfrescosharepoint,alfrescogoogledocs,libreofficecomponent \
–disable-components postgres \
–jdbc_url "jdbc:mysql://localhost/dbname?useUnicode=yes&characterEncoding=UTF-8" \
–jdbc_driver org.gjt.mm.mysql.Driver –jdbc_database dbname –jdbc_username dbuser \
–jdbc_password dbpassword –alfresco_ftp_port 2121 \
–alfresco_admin_password alfrescoadminpassword –baseunixservice_install_as_service 0 \
–alfrescocustomstack_services_startup demand

[/bash]

Change “dbname”, “dbuser”,”dbpassword”, “alfrescoadminpassword” with yours.

MySQL Note: In the example above I’m using MySQL, in this case you must have the DB already installed and when the command ends, copy the MySQL JDBC connector (mysql-connector-java-5.1.18-bin.jar) into the tomcat/lib directory.

Posgresql Note: If you want to install Posgresql it will be installed automatically using the installer but the command should be like this:

[bash]

sudo ./alfresco-enterprise-4.2.0.3-installer-linux-x64.bin –prefix /opt/alfresco \
–unattendedmodeui none –mode unattended –debuglevel 0 \
–enable-components javaalfresco,postgres,alfrescosharepoint,alfrescogoogledocs,libreofficecomponent \
–jdbc_url "jdbc:postgresql://localhost/dbname?useUnicode=yes&characterEncoding=UTF-8" \
–jdbc_driver org.postgresql.Driver –jdbc_database dbname –jdbc_username dbuser \
–jdbc_password dbpassword –alfresco_ftp_port 2121 \
–alfresco_admin_password alfrescoadminpassword –baseunixservice_install_as_service 0 \
–alfrescocustomstack_services_startup demand

[/bash]

In case of Postgresql none library has to be copied to tomcat/bin because is done by the installer.

Remember that it takes 1 or 2 minutes to finish the unattended installation, be patient.

More information and options? “–help” is your friend

./alfresco-enterprise-4.2.0.3-installer-linux-x64.bin –help

Alfresco Tip: add more OpenOffice or LibreOffice processes instances to JodConverter

Do you have a bottle neck on your transformations to PDF or any other format done by Libre or OpenOffice inside Alfresco?

This tip is thanks to a conversation with my colleague at Alfresco Antonio Soler. Due to the Alfresco Enterprise support for JodConverter this tip is not valid for the Community version.

Thanks to the JodConverter multiples LibreOffice or OpenOffice instances can be invoked to manage more transactions if needed. For example, one process can handle up to 200 transformations and then it is automatically restarted, if you need to manage more than this and add parallel processes  just add more ports comma separated in the JodConverter port option as seen below:

Screen Shot 2014-02-17 at 11.13.15 AM

After apply this change you can see three soffice processes:

Screen Shot 2014-02-17 at 11.12.52 AM

Remember, if you are using OpenOffice you will see “soffice.bin” process and “.soffice.bin” for LibreOffice.

If you want to know more about the new Admin Panel visit this blog post: http://blogs.alfresco.com/wp/kevinr/2013/09/30/alfresco-repository-admin-console/

Alfresco Tip: got the control and customize your logs (alfresco.log, share.log and solr.log)

Are you wondering about how to have full control on the Alfresco logs? If you are an Alfresco administrator I’m pretty sure you want to manage where the alfresco.log, share.log and solr.log are placed, right?

I asume you want to store all your alfresco logs in /opt/alfresco/tomcat/logs, which is the default logging directory for Tomcat and where you can find catalina.out log file as many other out-of-the-box logging files for this well known application server.

If you use the Alfresco installer or a default installation, logging files like alfresco.log, share.log and solr.log may be created where you run the “alfresco.sh start” script or where you start Tomcat. For example, in an installation placed in /opt/alfresco/, when you start Alfresco with ./alfresco.sh start (once you are in /opt/alfresco) those 3 files will be created in /opt/alfresco. If you are using the initd start/stop script for RedHat or Ubuntu you will see log files created in the root “/“ directory or maybe in the user home directory (it may depends).

Here you go how to manage all of these :
(Disclaimer: remember that after doing all said here, Alfresco will still logging some exception before override of the extension files take place).

  • Alfresco repository logs:

Valid for for any Alfresco version. Copy the original log4j properties from the alfresco deployed war file to the extension directory renamed as custom-log4j.properties:

[bash]

cp /opt/alfresco/tomcat/webapps/alfresco/WEB-INF/classes/log4j.properties /opt/alfresco/tomcat/shared/classes/alfresco/extension/custom-log4j.properties

[/bash]

Edit the custom-log4j.properties file and modify “log4j.appender.File.File” as your needs or like here:

[bash]
###### File appender definition #######
log4j.appender.File=org.apache.log4j.DailyRollingFileAppender
log4j.appender.File.File=/opt/alfresco/tomcat/logs/alfresco.log
log4j.appender.File.Append=true
log4j.appender.File.DatePattern=’.’yyyy-MM-dd
log4j.appender.File.layout=org.apache.log4j.PatternLayout
log4j.appender.File.layout.ConversionPattern=%d{ABSOLUTE} %-5p [%c] %m%n
[/bash]

  • Alfresco Share logs:

At the moment there is no extension mechanism for Share logs, then we can not do it in the same way as for Alfresco repository. In this case you only can edit /opt/alfresco/tomcat/webapps/share/WEB-INF/classes/log4j.properties file and modify appender line as shown below:

[bash]
log4j.appender.File.File=/opt/alfresco/tomcat/logs/share.log
[/bash]

The bad news with this method is that you will need to do it again when you upgrade Alfresco Share or redeploy share.war again.

  • Solr logs:

In Alfresco 4.2 (for previous versions see below): alf_data/solr/log4j-solr.properties you will find the configuration file, now change the line “log4j.appender.File.File” like below:

[bash]
# Set root logger level to error
log4j.rootLogger=WARN, Console, File

###### Console appender definition #######

# All outputs currently set to be a ConsoleAppender.
log4j.appender.Console=org.apache.log4j.ConsoleAppender
log4j.appender.Console.layout=org.apache.log4j.PatternLayout

log4j.appender.Console.layout.ConversionPattern=%d{ISO8601} %x %-5p [%c{3}] [%t] %m%n

###### File appender definition #######
log4j.appender.File=org.apache.log4j.DailyRollingFileAppender
log4j.appender.File.File=/opt/alfresco/tomcat/logs/solr.log
log4j.appender.File.Append=true
log4j.appender.File.DatePattern=’.’yyyy-MM-dd
log4j.appender.File.layout=org.apache.log4j.PatternLayout
log4j.appender.File.layout.ConversionPattern=%d{ABSOLUTE} %-5p [%c] %m%n

###### added Alfresco SOLR class logging #######
log4j.logger.org.alfresco.repo.search.impl.solr=INFO
log4j.logger.org.alfresco.solr.tracker.CoreTracker=ERROR
[/bash]

In previous Alfresco versions just bear in mind to copy the log file into the “solr/home” value defined in “{tomcat}/conf/Catalina/{hostname}/solr.xml”. You also may need to reload the Solr log4j resource from the Solr admin panel: https://localhost:8443/solr/admin/cores?action=LOG4J&resource=log4j-solr.properties
Also remember to use  https://localhost:8443/solr/alfresco/admin/logging to manage your Solr logs.

More info about Solr logs here: http://wiki.alfresco.com/wiki/Alfresco_And_SOLR#Load_Log4J_Settings and here https://issues.alfresco.com/jira/browse/MNT-5803

  • Last step for any configuration about the logs configuration is to restart your application server.

If you want to see and manage the logging with a web tool, see the Alfresco Support Tools in action (for Alfresco Enterprise only) here: https://addons.alfresco.com/addons/support-tools-admin-console. This is just an example about the logging section:

Screen Shot 2014-02-17 at 12.28.26 PM

If you want to know more about the new Admin Panel visit this blog post: http://blogs.alfresco.com/wp/kevinr/2013/09/30/alfresco-repository-admin-console/

UPDATE! Feb 20th

As Cesar mentioned in the comments, the easiest way to have control about where your logs are located just add this line to your init.d script (take care about these variables):

[bash]

su -c $ALF_USER “cd $ALF_LOGS && $ALF_HOME/alfresco.sh start”

[/bash]

Or even if you are using the alfresco.sh script directly add next lines just before the “ERROR=0” line:

[bash]

LOGSDIR=/opt/alfresco/tomcat/logs

cd $LOGSDIR

[/bash]

Alfresco Tip: Enable video thumbnail and transformations with FFMPEG

This is a quick tip to enable video thumbnail and transformations in Alfresco thanks to FFMPEG integration.  This feature can be integrated easily since Alfresco 4.X (for both Enterprise and Community).  The result on the thumbnail creation is something like this: Screen Shot 2014-02-14 at 3.13.19 PM Video format supported for the JPG thumbnail creation are: 3g2, 3gp, asf, avi, avx, flv, mov, movie, mp4, mpeg2, mpg, ogv and wmv. Other than that you will be able to create folder rules to transform between video formats, this is a sample rule to transform from MP4 to FLV: Screen Shot 2014-02-14 at 3.14.25 PM Thanks to the ffmpeg integration we will be able to transform video formats as shows below:

  • from 3g2 to flv
  • from 3gp to flv
  • from asf to flv
  • from avi to flv
  • from avx to flv
  • from mov to flv
  • from movie to flv
  • from mp4 to flv
  • from mpeg2 to flv
  • from mpg to flv
  • from ogv to flv
  • from wmv to flv
  • from 3g2 to mp4
  • from 3gp to mp4
  • from asf to mp4
  • from avx to mp4
  • from mov to mp4
  • from movie to mp4
  • from mpeg2 to mp4
  • from mpg to mp4
  • from wmv to mp4

By default in Alfresco, ffmpeg also supports next audio transformations:

  • from aiff to mp3
  • from au to mp3
  • from m4a to mp3
  • from oga to mp3
  • from wav to mp3

Now you may are wondering “does ffmpeg support mov to wmv video transformation?” No, it doesn’t do it by default with the out-of-the-box configuration. It only supports conversions TO mp4 and flv. You may add more formats using other tool than ffmpeg or customizing the existing transformers (see last paragraph of this post).

Installation: You already should have an Alfresco 4.2 up and running (it may works with 4.X and pretty similar for Windows and Linux). This procedure is very easy, just install ffmpeg, add some config lines to alfresco-global.properties, rename a couple of files and restart Alfresco:

  • Install ffmpeg on your server. I have installed the static binary for 64 bits from http://www.ffmpeg.org/download.html
  • Copy the ffmpeg binary (if static) to a place like  /opt/alfresco/common/bin/
  • Once you have this, run the command from the command line to see if it works correctly: ./ffmpeg
  • Edit your alfresco-global.properties and add next lines:

[bash]
ffmpeg.exe=/opt/alfresco/common/bin/ffmpeg

### Needed for video thumbnails ###
# ffmpeg.thumbnail
# ================
content.transformer.ffmpeg.thumbnail.priority=50
content.transformer.ffmpeg.thumbnail.extensions.3g2.jpg.supported=true
content.transformer.ffmpeg.thumbnail.extensions.3gp.jpg.supported=true
content.transformer.ffmpeg.thumbnail.extensions.asf.jpg.supported=true
content.transformer.ffmpeg.thumbnail.extensions.avi.jpg.supported=true
content.transformer.ffmpeg.thumbnail.extensions.avx.jpg.supported=true
content.transformer.ffmpeg.thumbnail.extensions.flv.jpg.supported=true
content.transformer.ffmpeg.thumbnail.extensions.mov.jpg.supported=true
content.transformer.ffmpeg.thumbnail.extensions.movie.jpg.supported=true
content.transformer.ffmpeg.thumbnail.extensions.mp4.jpg.supported=true
content.transformer.ffmpeg.thumbnail.extensions.mpeg2.jpg.supported=true
content.transformer.ffmpeg.thumbnail.extensions.mpg.jpg.supported=true
content.transformer.ffmpeg.thumbnail.extensions.ogv.jpg.supported=true
content.transformer.ffmpeg.thumbnail.extensions.wmv.jpg.supported=true

### Needed for video transformations ###
# ffmpeg.flv
# ==========
content.transformer.ffmpeg.flv.priority=50
content.transformer.ffmpeg.flv.extensions.3g2.flv.supported=true
content.transformer.ffmpeg.flv.extensions.3gp.flv.supported=true
content.transformer.ffmpeg.flv.extensions.asf.flv.supported=true
content.transformer.ffmpeg.flv.extensions.avi.flv.supported=true
content.transformer.ffmpeg.flv.extensions.avx.flv.supported=true
content.transformer.ffmpeg.flv.extensions.mov.flv.supported=true
content.transformer.ffmpeg.flv.extensions.movie.flv.supported=true
content.transformer.ffmpeg.flv.extensions.mp4.flv.supported=true
content.transformer.ffmpeg.flv.extensions.mpeg2.flv.supported=true
content.transformer.ffmpeg.flv.extensions.mpg.flv.supported=true
content.transformer.ffmpeg.flv.extensions.ogv.flv.supported=true
content.transformer.ffmpeg.flv.extensions.wmv.flv.supported=true

# ffmpeg.mp4
# ==========
content.transformer.ffmpeg.mp4.priority=50
content.transformer.ffmpeg.mp4.extensions.3g2.mp4.supported=true
content.transformer.ffmpeg.mp4.extensions.3gp.mp4.supported=true
content.transformer.ffmpeg.mp4.extensions.asf.mp4.supported=true
content.transformer.ffmpeg.mp4.extensions.avx.mp4.supported=true
content.transformer.ffmpeg.mp4.extensions.mov.mp4.supported=true
content.transformer.ffmpeg.mp4.extensions.movie.mp4.supported=true
content.transformer.ffmpeg.mp4.extensions.mpeg2.mp4.supported=true
content.transformer.ffmpeg.mp4.extensions.mpg.mp4.supported=true
content.transformer.ffmpeg.mp4.extensions.wmv.mp4.supported=true
# The avi and ogv to mp4 transformations did not work with ffmpeg 0.8.6
# Please check the latest ffmpeg documentation for the latest information
# content.transformer.avi.mp4.extensions.mpg.mp4.supported=true
# content.transformer.ogv.mp4.extensions.wmv.mp4.supported=true

# ffmpeg.mp3
# ==========
content.transformer.ffmpeg.mp3.priority=50
content.transformer.ffmpeg.mp3.extensions.aiff.mp3.supported=true
content.transformer.ffmpeg.mp3.extensions.au.mp3.supported=true
content.transformer.ffmpeg.mp3.extensions.m4a.mp3.supported=true
content.transformer.ffmpeg.mp3.extensions.oga.mp3.supported=true
content.transformer.ffmpeg.mp3.extensions.wav.mp3.supported=true

[/bash]

  • Find two files in your extension directory (tomcat/shared/clases/alfresco/extension) and rename them without the .sample extension: video-thumbnail-context.xml and video-transformation-context.xml
  • Restart the application server and done!

And what about if I want to do conversions to other formats? How can I do  transformation for changing resolution, size, quality and so forth? Just take a look to “video-transformation-context.xml” you will se how easy is to create a new commands using different options in the ffmpeg command.

This forum thread could be also helpful for you.

Essential commands for Alfresco BART

Alfresco BART usage:

[bash]
./alfresco-bart.sh [set] [date dest]
[/bash]

But what really modes are? With modes I mean different ways to use Alfresco BART depending of what do you want to do, for instance:

  • backup: runs an incremental backup or a full if first time
  • restore: runs the restore, wizard if no arguments, see below more commands with arguments [set] [date] [dest], while [set] can also be “all” for all sets.
  • verify: verifies the backup, it compares what you have backed up and what you have in your live system.
  • collection: shows all the backup sets already in the backup archive that might be restored.
  • list: lists the files currently backed up in the archive. It shows files contained in the last backup.

Sets:

  • no value: use all backup sets
  • index: use index backup set (group) for selected mode.
  • db: use data base backup set (group) for selected mode.
  • cs: use content store backup set (group) for selected mode.
  • files: use rest of files backup set (group) for selected mode.

Now lets see how to use Alfresco BART.

To make a backup:

[bash]
./alfresco-bart.sh backup
[/bash]

NOTE1: if first time, it makes a full backup
NOTE2: you should add this command to your root crontab with something like “0 5 * * * /path/to/alfresco-bart.sh backup” (without quotes) if you want to run your backup daily at 5AM (after Alfresco’s nightly backups and maintenance jobs).
NOTE3: running command above with without any data sets (index, db, cs or files) it will perform a backup of all data sets configured in alfresco-bart.properties. You can run “./alfresco-bart.sh backup files” to only perform a backup of your configuration files, installation and customization files or “./alfresco-bart.sh backup cs” to create a backup (full if first time or incremental if not) of your contentstore and additional stores configured.

Commands and options to restore backup:

To restore an existing backup guided by the wizard:

[bash]
./alfresco-bart.sh restore

################## Welcome to Alfresco BART Recovery wizard ###################

This backup and recovery tool does not overrides nor modify your existing
data, then you must have a destination folder ready to do the entire
or partial restore process.

##############################################################################

Choose a restore option:
1) Full restore
2) Set restore
3) Restore a single file of your Alfresco repository
4) Restore alfresco-global.properties from a given date
5) Restore other configuration file or directory

Enter an option [1|2|3|4|5] or CTRL+c to exit:
[/bash]

To restore the last (now) existing backup of all sets (all) and leave it in /tmp:

[bash]
./alfresco-bart.sh restore all now /tmp
[/bash]

To restore a DB backup from 14 days ago to /tmp:

[bash]
./alfresco-bart.sh restore db 14D /tmp
[/bash]

To restore the indexes backup from december 2nd 2013:

[bash]
./alfresco-bart.sh restore index 12-02-2013 /tmp
[/bash]

Valid date format is: now: for last backup, s: for second, m: minutes, h: hours, D: days, W: weeks, M: months or Y: years, all date values must be specified without spaces, i.e: 4D, 2W, 1Y, 33m. Dates may also be like: YYYY/MM/DD, YYYY-MM-DD, MM/DD/YYYY or MM-DD-YYYY.

To restore a single file deleted on the repository but existing in previous backup please use the backup wizard by typing: “./alfresco-bart.sh restore” and then follow instructions in the menu option “3”.

To restore the alfresco-global.properties configuration file from a given date please use the backup wizard by typing: “./alfresco-bart.sh restore” and then follow instructions in the menu option “4”.

Finally if you want to restore any other configuration, installation or custom file from your existing backup on a given date follow instructions by choosing option 5 in the recovery wizard.

NOTE4: Alfresco BART restore options or recovery wizard never will overrides your existing Alfresco files, you should specify a temporary recovery folder with enough space, then you have to move that content manually or following the instructions on the screen.

In case of source mismatch error with Duplicity try running this command:

[bash]
./alfresco-bart.sh backup all force
[/bash]

My talk about “Alfresco Backup and Recovery Tool” in the Alfresco Summit

All recorded videos has been published recently in the Alfresco Summit portal and here you go my talk “Alfresco Backup and Recovery Tool: A Real World Backup Solution” I gave in both Boston and Barcelona. I was the first public presentation about Alfresco BART.

Thanks to all who attended this session and made it one of the most-well attended and highest-rated in both cities. I’m looking forward to keep talking covering security topics as usual (I already have some “hack-ideas”…).

If you only want to see the demo, it starts at minute 33:

The presentation is published in Slideshare as well:

Remember you can download here the White Paper I mention during the talk.

If you only want to see the practical demo (best resolution in the talk video above), you can enjoy it here:

Any questions and comments are always welcome!